Azure Suspension setup tips
Here are some thoughts for setting your DW-link suspension bike. This is based on my experience with the Hollowpoint and Azure. It may be applicable to other bikes. I'm not sure if this is the 'right way' but at least it's a methodology that you can start with.
Overview:
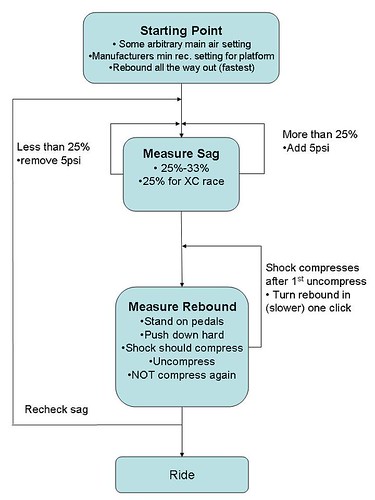
Step 1: Start somewhere
you gotta start somewhere. I just put some air in the main spring. Maybe 75% of your weight. And I put the minimum recommended by the manufacturer in the SPV/CVT platform chamber. For rebound I start with it all the way out (Fastest - bounciest)
Step 2: Measure Sag
What I do is ride around, bouncing up and down to make sure the platform is broken, then settle into a balanced position while seated on the bike. I then press then o-ring all the way down on the shock. Then slowly approach my car or a stool. With very light braking come to a stop by the stool or back of the car and step off the bike.
Using a ruler or calipers, measure how much the O-ring has moved. My shock has a stroke of 1.5"=38.1 mm. I am shooting for 25% sag so that is 9.5mm of travel.
If there is more than 25% sag, I add a few PSI to the main chamber and repeat. If less, I remove a few psi from the main chamber and repeat.
Step 2: Setting rebound
This is an area that I've never understood very well. Only a few weeks ago I read this thread at the IH forums at mtbr. In the thread, DW said this about setting up an Azure shock:
Just pump the shock up to give you 25% sag and tune the rebound so that when you jump on the pedals once, the suspension compresses, and then uncompresses, but does not compress a second time.
I've been doing this lately, and am amazed how it changes the characteristics of the bike. It feels much better, especially when climbing. I didn't realize how much the rebound settings also affect compression damping. I made a short video on what this compress/ucompress/not compress again looks like. In the video I think the rebound is still a tad fast, and I've since turned it in by a click.
Before reading this tip, I believe my rebound damping had been too low and it bounced too much.
Step 4: Recheck sag
I'm never sure how dependent each variable is on the other variables. So after setting the rebound, I just go back and redo the whole process of checking sag.
Step 5: ride
One thing I noticed is that the bike pedals/climbs stiffer with the rebound slower. It took some time to get used to but it feels really fast. It's always a compromise between climbing/pedaling and downhilling though and sometimes on downhills I'd like to decrease the rebound damping.
If I bottom out harshly, which never happens at my weight, you can turn up the platform. Or for courses with lots of climbing, I'll turn up the platform by 5psi.
posted by Ashwin Amanna @ 3:21 PM
0 comments
![]()


0 Comments:
Post a Comment
<< Home